Showing posts with label Furniture Revamps. Show all posts

Wednesday, April 10, 2013

Navy, Herringbone Dresser for Living Room


I'm still here...Busy and productive as ever. Just simply enjoying more "doing" and less "sharing" as before I guess! I will share another piece added to our living room that really anchored the space and made it feel so much more like home. For our large living space, I pulled all the furniture closer into the center, leaving more room between the sofa and the wall. I hate to have anything hanging on the wall without something below to "ground" it, so I brainstormed a piece to use on this wall that would still allow enough pass-through space for us to walk out into the porch. I LOVE a dresser in the living room!! I've seen it alot lately and they're often paired with lamps and artwork...AND provide a ton more storage.

This is the old dresser I started with:


 Because it was not solid wood, stripping and restaining it, like I originally wanted, was a no-go.

And because the top was so badly water-damaged, paint was not going to cover it there. 
I needed to paint the bottom and somehow cover the warped top surface. 

I remembered seeing a herringbone patterned stained table top from Thistlewood Farms using paint sticks, so that was my game plan for the top.

For the rest...
I could've gone turquoise.


 Or rustic black.


Or clean white.


 But I wanted something to stand out against our white walls and something more classic, so I decided on navy. I used Krylon's Oxford Blue spray paint after priming.

The top was not difficult, only time consuming. But I found it therapeutic and calming. I took my time putting my puzzle together and wood-glued the paint sticks (which I cut with a miter box and saw) in the herringbone pattern until it was all covered. Sanded, Stained, Poly'd. DONE!

The navy color you see in the above photo is closer to reality...Somehow the pictures inside look way more blue. It wasn't a good day for picture taking so they're all terrible, but it looks AMAZING with antique brass hardware and the Dark Walnut stained top!!

 It can be the perfect toy stow-away when future kids are using our living room as a playground. Everything can be out of site but in reach.


I'm a little obsessed with the top. It was a slight labor of love so I find myself running my hand across it every time I walk by. It's so rich and pretty!


~The Grays

Friday, January 4, 2013

Industrial, Aged Coffee Table ReDo


 I first diy'd this flea market coffee table while living in our college rental house. It was given a nice little facelift with a simple stain and paint treatment and fit well with our standard contemporary style at the time.

Before:
  

But in our current living room, it was too bland and needed a little more attention to make a statement. I loved the look of the industrial cart coffee tables, with hinges, bolts, and various other hardware pieces. I really wanted to find an old cart or door to use, but decided to give that look to the table we already had. I tried to find large casters that could be attached to the underside after cutting the legs off, but couldn't find any I liked, so I put that on the back burner.

I sanded her down.


 Rounded the edges with extra sanding (for a worn effect and future little ones)


 Then abused it with a hammer and nails for an aged look. I beat it in spots and drug the claw in streaks until I had what I wanted.


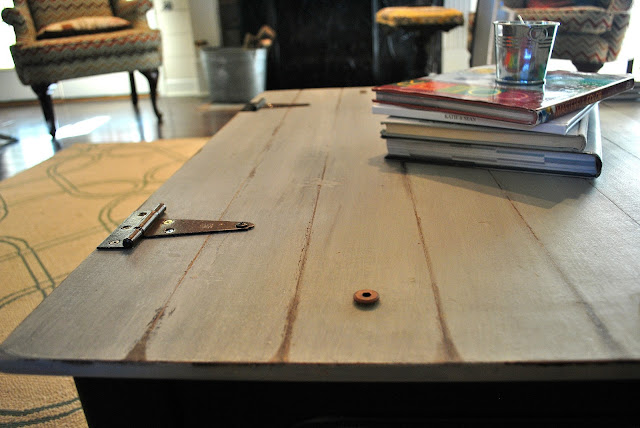
 I painted  a coat of light gray paint over the surface. Then added a little white paint and watered it down, and quickly gave it a streaky coat over that. Since it was lightly painted and watered down, it dried quick and I repeated that step, adding more white to lighten it again, and more water to thin it out. 
  

As a last touch up coat, I added streaks of gray and light gray until I liked it. I used a board as a straight edge and drug a nail along the table to scrape the gray paint off. I spaced it every 3 inches or so to create a faux plank top.


I thickened the line at the ends with a little brownish/black paint to round it off. And for the last step, I applied Minwax Paste Finishing Wax to get a protected, hard, smooth finish.


I picked up two hinges at the hardware store and spray painted them in layers of dark brown, metallic, and hammered spray paints and attached them with mismatched screws. Then screwed in some copper bolts at the ends of the planks. The legs stayed black, at least until I find some casters that I like to replace them with.


Here's the After:


I love how the gray-washing turned out, giving it dimension and aged character.

Distressing close-up:


It reminds me of a castle door.

And it fits in so much better now. There's a level of comfort to having distressed furniture in your home. The more use, abuse, and "uh-oh"s, the better!


Thanks for stopping by!
The Grays

Sunday, November 18, 2012

Diamond-Pattern Painted Plywood Floor


How’s it going, friends? I’m anxiously awaiting Thanksgiving breakThe food and relaxation is so close I can taste it. Right now, though, I’m full steam ahead on lots of huge projects going on at once. My body is protesting my mind and begging me to stop climbing that darn ladder but I’m running on passion and sweet tea so I’m determined to finish in time for turkey and dressing!

THREE more rooms-worth of crusty carpet have been tossed to the curb! (Have you caught on to my hatred of carpet yet?)  I ripped out the carpet in our upstairs hallway a couple months ago. I was inspired by the diamond-patterned floor in these pictures.


And was crazy enough to tackle it.

I must say, I’ve got quite the skill set with tedious artwork like this. My fault lied, apparently, in choosing the right sealer. 
Critical mistake. 
One that caused me to complete this entire floor (yes, every single diamond) by hand TWICE. Once wasn’t hard enough, I guess. But I’ll explain the steps and maybe you can do as I say and not as I did

I started with a rigorous bicep/tricep and forearm workout with the task of ripping all the carpet out and throwing it over the banister.
Next, removed the tack strips. Then filled the holes with wood putty and lightly sanded over any rough spots. 


I used porch and floor paint in SW “Accessible Beige” and gave it all 2 coats with a roller. 

I figured out the measurements for my diamonds and made a cardboard stencil. 

 
I traced the outlines with chalk and then began painting in the outlines with more porch and floor paint, in “olivewood” by glidden. Then did it all again to coat a second time. 


Once everything was painted, which took about a week of working here and there, I was ready to give it a shiny coat of semi-gloss water-based polyurethane. My poor right hand could barely sign my name at work so I was ready to put the seal of approval on this project.

I decided to try Minwax’s Water-Based, Oil-Modified Poly, because it was recommended to be a tougher coating for floors. I knew when coating over a light color, I would need water-based to prevent yellowing. I didn’t know the “Oil-Modified” part of the equation would still make my floors turn a gunky, disgusting yellow almost immediately when dried.


I walked up to the top of the stairs to check the glossy, polished finish
And I gasped and stared, frozen...Not sure if I wanted to cry, cuss, or scream. So I did a little of all three.

  
{This picture shows the contrast between the yellowed part and the part and where I later painted over with beige} 

After coming-to and pulling myself together, I brainstormed a few remedies to my problem. But all involved painting over it. There was no easy fix. I decided to let it sit for a few weeks, so that maybe the memory of the hours of tedious, meticulous work was a little farther in the past. I figured it was like child-birth. Give it a little while and you’re ready to go again, right?

After walking away from it for a week or so, I was motivated to right the wrong. I didn’t want to use a roller to paint the background beige again, since that would mean starting with a clean slate and having to re-draw every diamond again. Instead, I used a brush to paint beige around and inside every diamond (twice) then painted over each diamond with the darker color as before.


Looking back on it, I don’t even remember how long it took. I blocked out all the negative, I guess. I just know that I love it now that it’s finished! This time, I used Rustoleum Pro Finisher Water-Based Polyurethane for Floors and loved it. No complaints months laterit still looks beautiful. Lesson learned. The hard way! Oh the life of a DIYer...

I installed all the quarter round as the last step and finally closed this chapter. 

                          Before                                                    After


                        Before                                                  After


As a bonus, I found a little wood console at a thrift store for $12 and it seemed to be the right width for the hallway nook. After sawing a quarter inch off each side and painting it white, it fit snugly inside to make the built-in seem more substantial.  


I’d still like to add molding and maybe repaint and restyle the shelves, but it was a perfect find.      
I love the feel when walking on the painted floor barefoot. It’s pretty smooth, but textured enough to not be slick. It gives the hallway an artsy look.


After as much as I went through for this floor, I think I would convince myself that I liked it even if I didn't. But thank God I do!

I guess I'm on a painted floor kick lately. 2 more rooms with painted floors are done! Check back with us. 

~The Grays

Monday, September 17, 2012

Vintage Travel Trunk

My Aunt Susie has this old...Old...OLD...family heirloom black travel trunk that she is sure was brought over from Italy when the family came to America.


She asked me to do a little something to make it more special and I bounced around several ideas for a few weeks. I was going to mod-podge a map of Italy using scrapbook paper but couldn't find any after several shopping trips. Then I had the idea of painting the top to look like a blown-up version of a vintage postcard from Ancona, Italy...where our family is from. It was a really easy project and just took me a day to finish.

I primed the top with spray primer, using just a light coat.


Then I painted the base coat a creamy, light tan; the color an aged postcard would be. She plans to put it by her sunroom, so I used a black paint pen to script the following quote, translated into Italian:

::Home sweet home:
Where ivy grows, roses bloom,
and sunlight fills my favorite room. ::

I sanded lightly by hand to distress age it, then top coated with 2 coats of a water-based poly.

Here's the finished Product:


The "stamp" has the year they immigrated, 1902, and the city they were from.


I wrote the English translation on the inside of the trunk.


I think it turned out classy, eclectic, and hopefully special.


Until next time!
Katie

Sunday, August 19, 2012

DIY Play Kitchen


I did it. I jumped on the play-kitchen band wagon. Avery is turning 2 the end of August and in preparing for her birthday party, I thought back to my favorite things to play with when I was her age. As I was a domestic diva and mini-Betty Crocker from day one, it was most definitely my play kitchen and my Barbie corvette. (How else was I supposed to go get the groceries to cook?) 

Since I tend to torture myself with being determined to make  everything...myself...I wanted to do something homemade for our Baby Avery. And seeing as how making a Barbie corvette is just a tad out of my do-it-yourself prowess, I elected to make her a play kitchen!
I went to my number one spot for finding exactly any piece I need (Dad's house) and he helped me look through some options in the garage. I chose this entertainment center that my Meemaw had and I knew I could work with it.


It was impossible to look at it from this next angle without whispering:
"Lean wit it. 
Rock wit it.
Lean wit it.
Rock wit it."

 
 The bottom was water damaged and needed to be removed. 

I cut it down to 3 feet tall, then cut a board the correct length and braced it across the back to replace the flimsy cardboard. 


So it looked like this:
 

After cleaning it and swiping the life out of 19 spiders (yes I counted...and yes, with my bare hands. I'm a baaaad man) I gave it a coat of Zinsser's oil-based primer. I should have done 2, but I'm impatient. Do as I say, not as I do, ya know?
 Next, was a coat of white in "classic creme".  
After the basic shape and painting was done, I drew up a plan and forged on down the list.


I got to work on the sink first. I couldn't find a silver or steel bowl when I was looking, because nothing is as simple as it should be, right? So I bought a white one and spray painted it.

 I found this perfect little faucet for $1.25 at ReStore, of course!


Next up, was the counter top "tile" and "backsplash."
 

After finishing the tile, painting the "fridge door" turquoise and the "stove top" dark metallic gray, we were really starting to take shape!


Last step was to cut the right door in half to become the oven and microwave. I put a hinge on the right side for the microwave to open and a hinge on the bottom for the oven to open down.


 Then it was the best part...Accessorizing! I cut a scenic picture from a poetry book and placed it in a frame to create the window.


And the rest is self explanatory...

TA-DA!!


 Is it cheesy to say I'm tickled?? Because I am! 

Yes, it ended up being more complicated in some ways than I anticipated, but that's pretty much always true. And my irritation was mostly brought on by 100% humidity that left me sweltering in the garage and made the paint very difficult to adhere and dry. I would have enjoyed myself much more working on it now that our Arkansas temps have dropped a little!  


I added a drawer pull from ReStore on the side for a towel bar...


 ...And a piece of fabric over the frame for the window.


I think the sink is my favorite part! The tiny colander is from TJ Maxx. 
 

The fridge:

Microwave:

And oven:

The curtain hides under-sink storage.


The stove is simmering a pot of spaghetti sauce and some tea! I found the mini pots and pans at Goodwill for $1 each. I spray painted the old knobs from out bathroom vanity.


 I think it's cute as a button and I hope Avery does too!


Avery's party was Sunday afternoon. It was the perfect day to sit in the shade and visit, sipping a cold coke. 
And it was the perfect day for Avery to see her new kitchen!

Blow out the candles, baby girl. You're TWO years old!


Lindsay couldn't wait for present opening time so Sean and I brought the kitchen from the truck and Avery wasted no time before exploring. 


 She's just so smart...when she first went to use the sink, she said "It's not on!" Sorry, baby Avery, KK's not that good! She rinsed her vegetables, washed her hands, baked cupcakes, and added "water" to her flower vase. So grown up!

Baby Davis hung out with KK and enjoyed attending her first birthday party.


This one's a wrap!
  

Happy Birthday Baby A!
~KK